How to authenticate
Authentication
Apache Gravitino supports three kinds of authentication mechanisms: simple, OAuth and Kerberos.
If you don't enable authentication for your client and server explicitly, the user anonymous will be used to access the server.
Simple mode
In simple mode, the client uses the value of the GRAVITINO_USER environment variable as the username.
If the environment variable GRAVITINO_USER in the client isn't set, the client defaults to the username of the user logged into the machine sending the requests.
For the client side, users can enable simple mode by the following code:
GravitinoClient client = GravitinoClient.builder(uri)
    .withMetalake("metalake")
    .withSimpleAuth()
    .build();
Additionally, the username can be directly used as a parameter to create a client.
GravitinoClient client = GravitinoClient.builder(uri)
    .withMetalake("metalake")
    .withSimpleAuth("test_user_name")
    .build();
OAuth mode
Gravitino supports external OAuth 2.0 servers with two token validation methods:
- Static signing key validation - Uses a pre-configured signing key to validate JWT tokens
- JWKS-based validation - Dynamically fetches public keys from OAuth provider's JWKS endpoint (supports OIDC providers like Azure AD, and other JWKS-compatible providers)
To enable OAuth mode:
- First, ensure the external OAuth 2.0 server supports Bearer JWT tokens.
- For static key validation: Configure
gravitino.authenticator.oauth.defaultSignKey,gravitino.authenticator.oauth.serverUriandgravitino.authenticator.oauth.tokenPath. - For JWKS validation: Configure
gravitino.authenticator.oauth.jwksUriandgravitino.authenticator.oauth.tokenValidatorClass=org.apache.gravitino.server.authentication.JwksTokenValidator. You can use eithergravitino.authenticator.oauth.provider=defaultorgravitino.authenticator.oauth.provider=oidcdepending on whether you want Web UI OIDC login flow. - For Web UI OIDC authentication: Set
gravitino.authenticator.oauth.provider=oidcand configuregravitino.authenticator.oauth.clientId,gravitino.authenticator.oauth.authority, andgravitino.authenticator.oauth.scope. These settings are exposed to the Web UI via the/configsendpoint to enable OAuth login flow. Configure your OAuth provider with the callback redirect URI:https://your-gravitino-server/ui/oauth/callback. - Next, for the client side, users can enable
OAuthmode by the following code:
DefaultOAuth2TokenProvider authDataProvider = DefaultOAuth2TokenProvider.builder()
    .withUri("oauth server uri")
    .withCredential("yy:xx")
    .withPath("oauth/token")
    .withScope("test")
    .build();

GravitinoClient client = GravitinoClient.builder(uri)
    .withMetalake("metalake")
    .withOAuth(authDataProvider)
    .build();
Kerberos mode
To enable Kerberos mode, users must ensure that the server and client have the correct Kerberos configuration. On the server side, users should set gravitino.authenticators as kerberos and give
gravitino.authenticator.kerberos.principal and gravitino.authenticator.kerberos.keytab a proper value. For the client side, users can enable kerberos mode by the following code:
// Use keytab to create KerberosTokenProvider
KerberosTokenProvider provider = KerberosTokenProvider.builder()
        .withClientPrincipal(clientPrincipal)
        .withKeyTabFile(new File(keytabFile))
        .build();

// Use ticketCache to create KerberosTokenProvider
KerberosTokenProvider provider = KerberosTokenProvider.builder()
        .withClientPrincipal(clientPrincipal)
        .build();

GravitinoClient client = GravitinoClient.builder(uri)
    .withMetalake("metalake")
    .withKerberosAuth(provider)
    .build();
Currently, the Iceberg REST service does not support Kerberos authentication. The URI must be the server's hostname instead of its IP address.
Custom mode
Gravitino also supports custom authentication implementations.
For server side, you can implement the interface Authenticator and specify gravitino.authenciators.
For client side, you extend the abstract class CustomTokenProvider and specify the token provider.
GravitinoClient client = GravitinoClient.builder(uri)
    .withMetalake("metalake")
    .withCustomProvider(provider)
    .build();
Server configuration
Gravitino server and Gravitino Iceberg REST server share the same configuration items, you doesn't need to add gravitino.iceberg-rest prefix for Gravitino Iceberg REST server.
| Configuration item | Description | Default value | Required | Since version |
|---|---|---|---|---|
gravitino.authenticator | It is deprecated since Gravitino 0.6.0. Please use gravitino.authenticators instead. | simple | No | 0.3.0 |
gravitino.authenticators | The authenticators which Gravitino uses, setting as simple,oauth or kerberos. Multiple authenticators are separated by commas. If a request is supported by multiple authenticators simultaneously, the first authenticator will be used by default. | simple | No | 0.6.0-incubating |
gravitino.authenticator.oauth.serviceAudience | The audience name when Gravitino uses OAuth as the authenticator. | GravitinoServer | No | 0.3.0 |
gravitino.authenticator.oauth.allowSkewSecs | The JWT allows skew seconds when Gravitino uses OAuth as the authenticator. | 0 | No | 0.3.0 |
gravitino.authenticator.oauth.defaultSignKey | The signing key of JWT when Gravitino uses OAuth as the authenticator. | (none) | Yes if use oauth as the authenticator | 0.3.0 |
gravitino.authenticator.oauth.signAlgorithmType | The signature algorithm when Gravitino uses OAuth as the authenticator. | RS256 | No | 0.3.0 |
gravitino.authenticator.oauth.serverUri | The URI of the default OAuth server. | (none) | Yes if use oauth as the authenticator | 0.3.0 |
gravitino.authenticator.oauth.tokenPath | The path for token of the default OAuth server. | (none) | Yes if use oauth as the authenticator | 0.3.0 |
gravitino.authenticator.oauth.provider | OAuth provider type (default, oidc). Determines the Web UI authentication flow. Use 'oidc' for Web UI OIDC login, 'default' for legacy login or API-only authentication. | default | No | 1.0.0 |
gravitino.authenticator.oauth.clientId | OAuth client ID for Web UI authentication. | (none) | Yes if provider is oidc | 1.0.0 |
gravitino.authenticator.oauth.authority | OAuth authority/issuer URL for OIDC providers for web UI authentication. (e.g., Azure AD tenant URL). | (none) | Yes if provider is oidc | 1.0.0 |
gravitino.authenticator.oauth.scope | OAuth scopes for Web UI authentication (space-separated). | (none) | Yes if provider is oidc | 1.0.0 |
gravitino.authenticator.oauth.jwksUri | JWKS URI for server-side OAuth token validation. Required when using JWKS-based validation. | (none) | Yes if tokenValidatorClass is org.apache.gravitino.server.authentication.JwksTokenValidator | 1.0.0 |
gravitino.authenticator.oauth.principalFields | JWT claim field(s) to use as principal identity. Comma-separated list for fallback in order (e.g., 'preferred_username,email,sub'). | sub | No | 1.0.0 |
gravitino.authenticator.oauth.tokenValidatorClass | Fully qualified class name of the OAuth token validator implementation. Use org.apache.gravitino.server.authentication.JwksTokenValidator for JWKS-based validation or org.apache.gravitino.server.authentication.StaticSignKeyValidator for static key validation. | org.apache.gravitino.server.authentication.StaticSignKeyValidator | No | 1.0.0 |
gravitino.authenticator.kerberos.principal | Indicates the Kerberos principal to be used for HTTP endpoint. Principal should start with HTTP/. | (none) | Yes if use kerberos as the authenticator | 0.4.0 |
gravitino.authenticator.kerberos.keytab | Location of the keytab file with the credentials for the principal. | (none) | Yes if use kerberos as the authenticator | 0.4.0 |
The signature algorithms that Gravitino supports follows:
| Name | Description |
|---|---|
| HS256 | HMAC using SHA-25A |
| HS384 | HMAC using SHA-384 |
| HS512 | HMAC using SHA-51 |
| RS256 | RSASSA-PKCS-v1_5 using SHA-256 |
| RS384 | RSASSA-PKCS-v1_5 using SHA-384 |
| RS512 | RSASSA-PKCS-v1_5 using SHA-512 |
| ES256 | ECDSA using P-256 and SHA-256 |
| ES384 | ECDSA using P-384 and SHA-384 |
| ES512 | ECDSA using P-521 and SHA-512 |
| PS256 | RSASSA-PSS using SHA-256 and MGF1 with SHA-256 |
| PS384 | RSASSA-PSS using SHA-384 and MGF1 with SHA-384 |
| PS512 | RSASSA-PSS using SHA-512 and MGF1 with SHA-512 |
Example: Azure AD as OIDC Provider with JWKS Validation
This example shows how to configure Gravitino with Azure AD using JWKS-based token validation.
Prerequisites:
- Azure AD tenant with an application registration
- Application configured with:
- Client ID (Application ID)
- Redirect URI:
https://your-gravitino-server/ui/oauth/callback - Required API permissions/scopes (typically
openid,profile,email)
Configuration:
# Enable OAuth authentication
gravitino.authenticators = oauth

# OIDC Provider Configuration for Web UI
gravitino.authenticator.oauth.provider = oidc
gravitino.authenticator.oauth.clientId = <your-azure-app-client-id>
gravitino.authenticator.oauth.authority = https://sts.windows.net/<your-tenant-id>/
gravitino.authenticator.oauth.scope = openid profile email

# JWKS-based Token Validation
gravitino.authenticator.oauth.jwksUri = https://login.microsoftonline.com/<your-tenant-id>/discovery/v2.0/keys
gravitino.authenticator.oauth.tokenValidatorClass = org.apache.gravitino.server.authentication.JwksTokenValidator
gravitino.authenticator.oauth.serviceAudience = <your-azure-app-client-id-or-api-identifier>
gravitino.authenticator.oauth.principalFields = preferred_username,email,sub
Usage:
- Web UI: Navigate to Gravitino Web UI, which will redirect to Azure AD for authentication
- API Access: Use Azure AD tokens in the
Authorization: Bearer <token>header
The serviceAudience should match the aud claim in your Azure AD tokens. This is typically your Azure AD application's client ID, but could be a custom API identifier if you've configured custom API scopes (e.g., api://<client-id>).
The principalFields supports multiple fallback options. Gravitino will try each field in order (e.g., first preferred_username, then email, then sub) until it finds a non-null value to use as the user identity.
With JWKS validation, you don't need to configure defaultSignKey, serverUri, or tokenPath as the validator dynamically fetches public keys from Azure AD's JWKS endpoint.
Example: Static Key OAuth Provider
For compatibility with existing OAuth servers that don't support JWKS:
gravitino.authenticators = oauth
gravitino.authenticator.oauth.provider = default
gravitino.authenticator.oauth.clientId = test
gravitino.authenticator.oauth.scope = test
gravitino.authenticator.oauth.serviceAudience = test
gravitino.authenticator.oauth.tokenValidatorClass = org.apache.gravitino.server.authentication.StaticSignKeyValidator
gravitino.authenticator.oauth.serverUri = http://your-oauth-server
gravitino.authenticator.oauth.tokenPath = /oauth2/token
gravitino.authenticator.oauth.defaultSignKey = <your-static-signing-key>
Example: JWKS Validation with Default Provider
For JWKS-based token validation without Web UI OIDC workflow:
gravitino.authenticators = oauth
gravitino.authenticator.oauth.provider = default
gravitino.authenticator.oauth.serviceAudience = <your-audience>
gravitino.authenticator.oauth.tokenValidatorClass = org.apache.gravitino.server.authentication.JwksTokenValidator
gravitino.authenticator.oauth.jwksUri = https://your-oauth-provider/.well-known/jwks.json
Example
You can follow the steps to set up an OAuth mode Gravitino server.
-
Prerequisite
You need to install the JDK8 and Docker.
-
Set up an external OAuth 2.0 server
There is a sample-authorization-server based on spring-authorization-server. The image has registered client information in the external OAuth 2.0 server and its clientId is
test, secret istest, scope istest.
docker run -p 8177:8177 --name sample-auth-server -d datastrato/sample-authorization-server:0.3.0
-
Open the JWK URL of the Authorization server in the browser and you can get the JWK.

-
Convert the JWK to PEM. You can use the online tool or other tools.
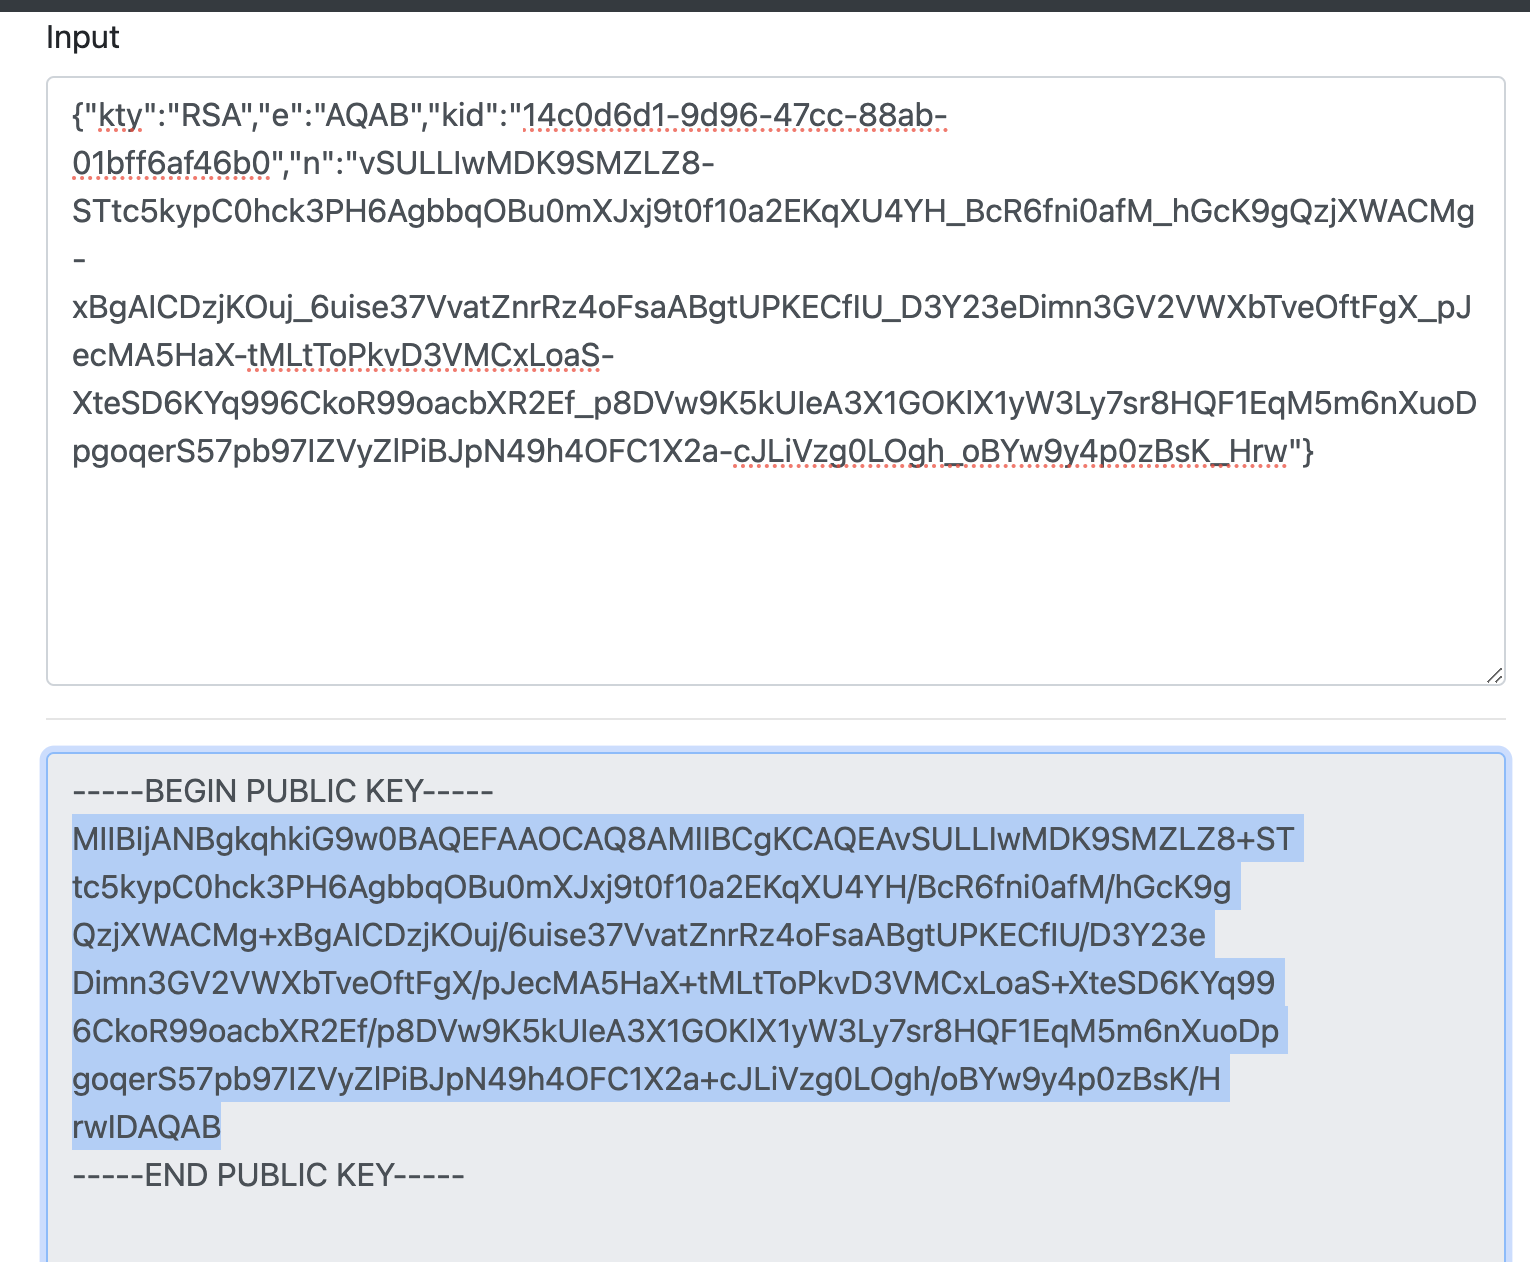
-
Copy the public key and remove the character
\nand you can get the default signing key of Gravitino server. -
Refer to the Configurations and append the configurations to the conf/gravitino.conf.
gravitino.authenticators = oauth
gravitino.authenticator.oauth.serviceAudience = test
gravitino.authenticator.oauth.defaultSignKey = <the default signing key>
gravitino.authenticator.oauth.tokenPath = /oauth2/token
gravitino.authenticator.oauth.serverUri = http://localhost:8177
-
Open the URL of Gravitino server and login in with clientId
test, clientSecrettest, and scopetest.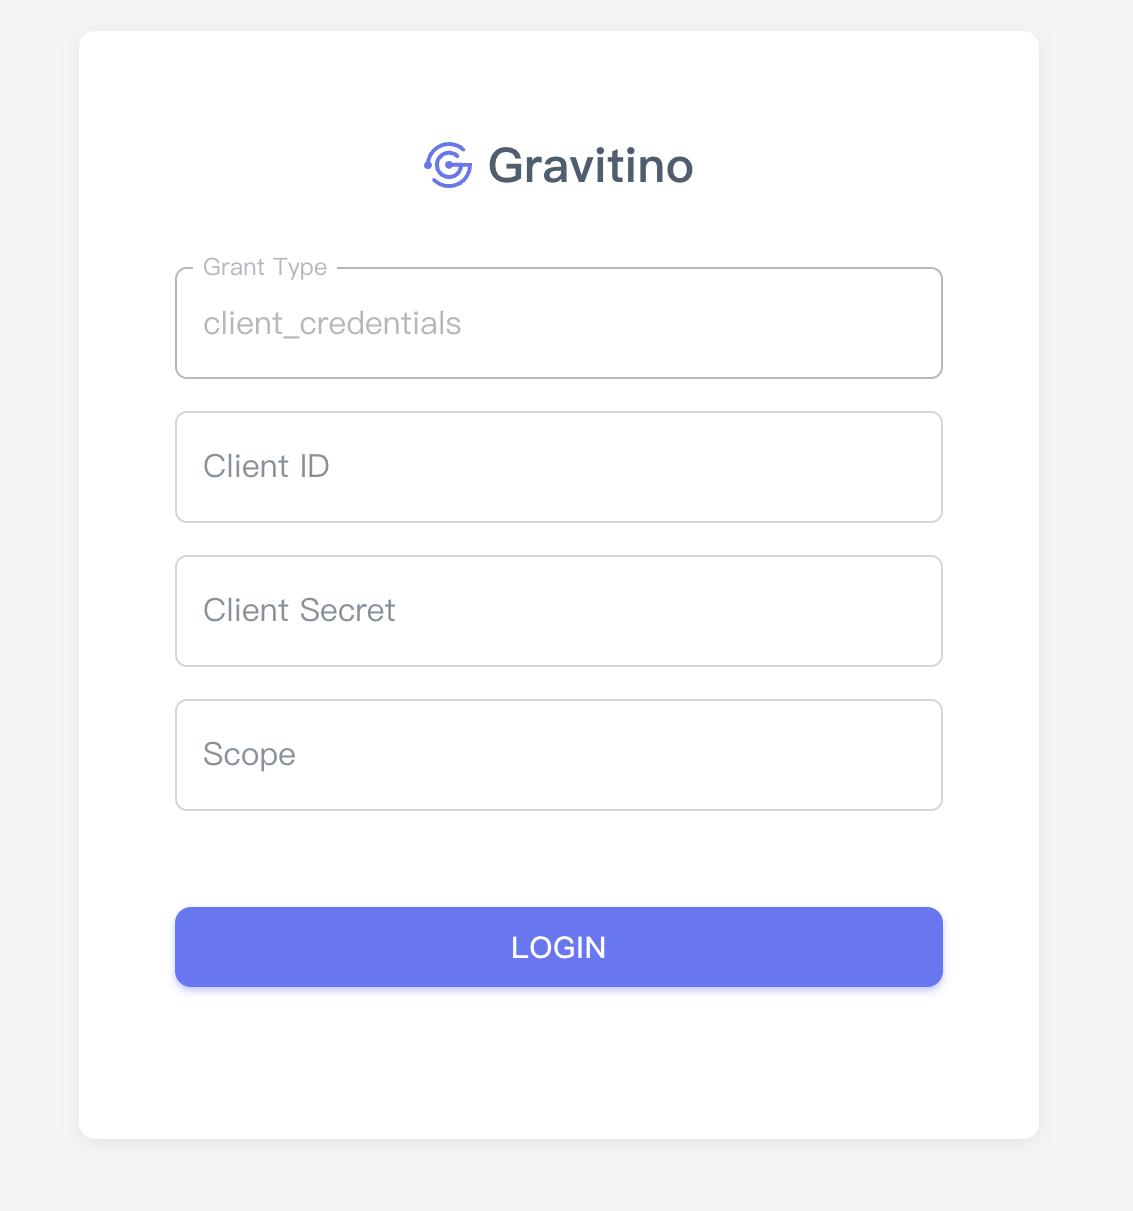
-
You can also use the curl command to access Gravitino.
Get access token
curl --location --request POST 'http://127.0.0.1:8177/oauth2/token?grant_type=client_credentials&client_id=test&client_secret=test&scope=test'
Use the access token to request the Gravitino
curl -v -X GET -H "Accept: application/vnd.gravitino.v1+json" -H "Content-Type: application/json" -H "Authorization: Bearer <access_token>" http://localhost:8090/api/version
Example: Keycloak as OAuth providers
- Set up an external Keycloak server, you can refer to Keycloak document
docker run -dti -p 8080:8080 -e KC_BOOTSTRAP_ADMIN_USERNAME=admin -e KC_BOOTSTRAP_ADMIN_PASSWORD=admin quay.io/keycloak/keycloak:26.2.5 start-dev
-
Go to the Keycloak admin console, log in with the initial admin user with the username
adminand passwordadmin -
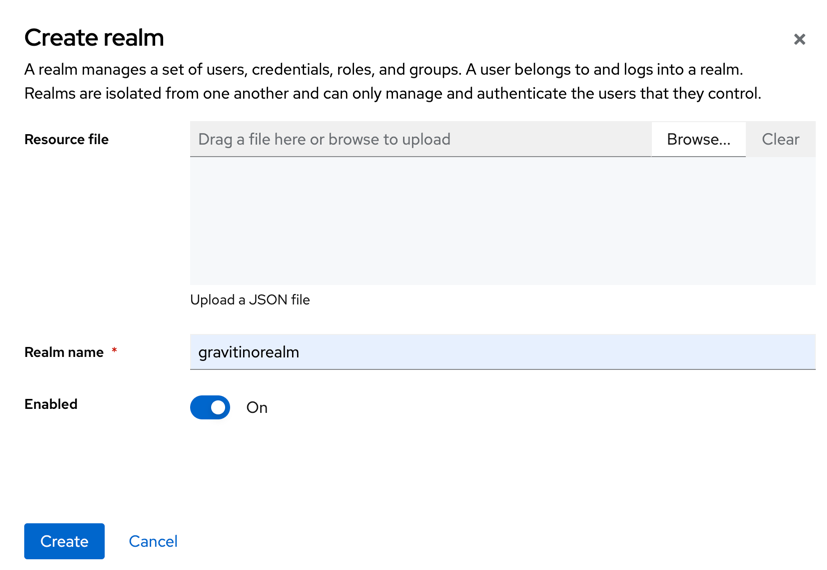
Create a realm for Gravitino
- Click Manage realms in the left-hand menu.
- Click Create realm button
-
Get the
gravitinorealmpublic key, which is the<the default signing key>in gravitino.conf Accesshttp://localhost:8080/realms/gravitinorealmin browser
-
Add users
Initially, the realm has no users. Use these steps to create a user:
- Verify that you are still in the gravitinorealm realm, which is next to Current realm.
- Click Users in the left-hand menu.
- Click Create new user.
- Fill in the form with the following values:
Username: usera, First name: any first name, Last name: any last name, Email: any email - Click credentials, fill in the Set password form with a password.
- Toggle Temporary to Off so that the user does not need to update this password at the first login.
You can now log in to the Account Console(gravitinorealm) to verify this user is configured correctly.
-
Register Gravitino in Keycloak
- Click gravitinorealm next to Current realm.
- Click Clients.
- Click Create client
- Fill in Client type:
OpenID ConnectClient ID:gravitino-client - Click Next
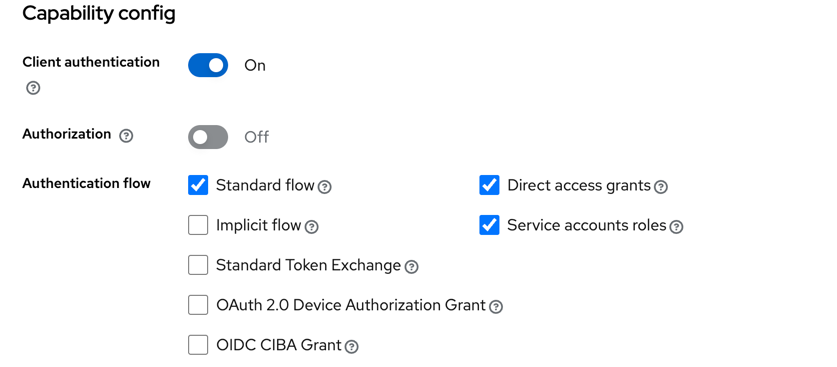
- Confirm that
Client authenticationStandard flowDirect access grantsService accounts rolesis enabled. - Click Next
- Set Valid redirect URIs to
http://localhost:8090/* - Set Web origins to
http://localhost:8090 - Click Save.
- Click Credentials tab page, get
Client Secret.
-
You can refer to the Configurations and append the configurations to the conf/gravitino.conf.
gravitino.authenticators = oauth
gravitino.authenticator.oauth.serviceAudience = account
gravitino.authenticator.oauth.defaultSignKey = <the default signing key>
gravitino.authenticator.oauth.tokenPath = /realms/gravitinorealm/protocol/openid-connect/token
gravitino.authenticator.oauth.serverUri = http://localhost:8080
- Use client credentials to authenticate. The
access tokenis bound to a service account.
Get access token
curl \
  -d "client_id=gravitino-client" \
  -d "client_secret=FL20ezBgQAOlDQeNifzwliQ56wohhqNo" \
  -d "grant_type=client_credentials" \
  "http://localhost:8080/realms/gravitinorealm/protocol/openid-connect/token"
Use the access token to request the Gravitino
curl -v -X GET -H "Accept: application/vnd.gravitino.v1+json" -H "Content-Type: application/json" -H "Authorization: Bearer <access_token>" http://localhost:8090/api/version
- Use password to authenticate users. The openid scope returns an
id_tokenthat includes user information which can be used for consumer mapping and group mapping in future posts.
Get access token
curl \
  -d "client_id=gravitino-client" \
  -d "client_secret=FL20ezBgQAOlDQeNifzwliQ56wohhqNo" \
  -d "username=usera" \
  -d "password=Admin@123" \
  -d "grant_type=password" \
  -d "scope=openid" \
  "http://localhost:8080/realms/gravitinorealm/protocol/openid-connect/token"
Use the access token to make requests to the Gravitino server:
curl -v -X GET -H "Accept: application/vnd.gravitino.v1+json" -H "Content-Type: application/json" -H "Authorization: Bearer <access_token>" http://localhost:8090/api/version
For Gravitino Iceberg REST Service, the 'Accept: application/vnd.gravitino.v1+json' header is not required, you could use following command:
curl -v -X GET -H "Content-Type: application/json" -H "Authorization: Bearer <access_token>" http://127.0.0.1:9001/iceberg/v1/config