Apache Gravitino Python client
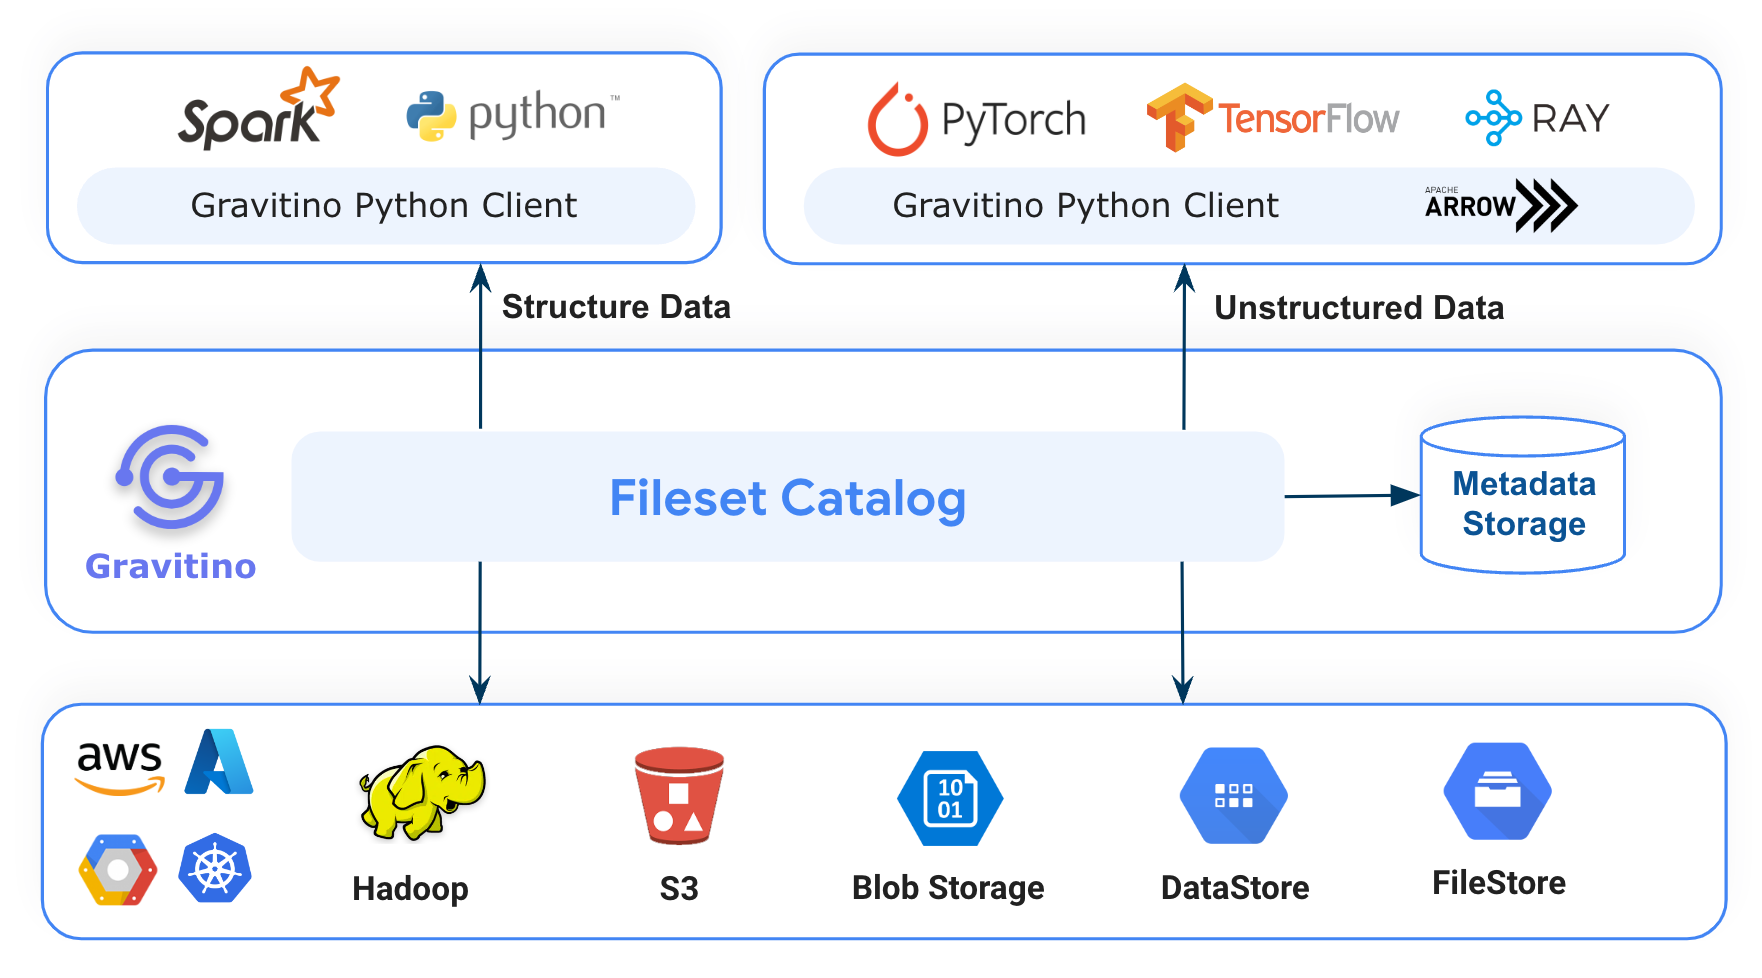
Apache Gravitino is a high-performance, geo-distributed, and federated metadata lake. It manages the metadata directly in different sources, types, and regions, also provides users the unified metadata access for data and AI assets.
Gravitino Python client helps data scientists easily manage metadata using Python language.
Use Guidance
You can use Gravitino Python client library with Spark, PyTorch, Tensorflow, Ray and Python environment.
First of all, You must have a Gravitino server set up and run, You can refer document of How to install Gravitino to build Gravitino server from source code and install it in your local.
Apache Gravitino Python client API
pip install apache-gravitino
Apache Gravitino Fileset Example
We offer a playground environment to help you quickly understand how to use Gravitino Python client to manage non-tabular data on HDFS via Fileset in Gravitino. You can refer to the document How to use the playground to launch a Gravitino server, HDFS and Jupyter notebook environment in you local Docker environment.
Waiting for the playground Docker environment to start, you can directly open
http://localhost:18888/lab/tree/gravitino-fileset-example.ipynb in the browser and run the example.
The gravitino-fileset-example contains the following code snippets:
- Install HDFS Python client.
- Create a HDFS client to connect HDFS and to do some test operations.
- Install Gravitino Python client.
- Initialize Gravitino admin client and create a Gravitino metalake.
- Initialize Gravitino client and list metalakes.
- Create a Gravitino
Catalogand specialtypeisCatalog.Type.FILESETandprovideris fileset - Create a Gravitino
Schemawith thelocationpointed to a HDFS path, and usehdfs clientto check if the schema location is successfully created in HDFS. - Create a
Filesetwithtypeis Fileset.Type.MANAGED, usehdfs clientto check if the fileset location was successfully created in HDFS. - Drop this
Fileset.Type.MANAGEDtype fileset and check if the fileset location was successfully deleted in HDFS. - Create a
Filesetwithtypeis Fileset.Type.EXTERNAL andlocationpointed to exist HDFS path - Drop this
Fileset.Type.EXTERNALtype fileset and check if the fileset location was not deleted in HDFS.
How to develop Apache Gravitino Python Client
You can ues any IDE to develop Gravitino Python Client. Directly open the client-python module project in the IDE.
Prerequisites
- Python 3.9+
- Refer to How to build Gravitino to have necessary build environment ready for building.
Build and testing
-
Clone the Gravitino project.
git clone git@github.com:apache/gravitino.git -
Build the Gravitino Python client module
# Default Python version is 3.9
./gradlew :clients:client-python:build
# If you want to build Python client with specific Python version,
# add `-PpythonVersion` with version number:
./gradlew :clients:client-python:build -PpythonVersion=3.10 -
Run unit tests
./gradlew :clients:client-python:test -PskipITs -
Run integration tests
Because Python client connects to Gravitino Server to run integration tests, So it runs
./gradlew compileDistribution -x testcommand automatically to compile the Gravitino project in thedistributiondirectory. When you run integration tests via Gradle command or IDE, Gravitino integration test framework (integration_test_env.py) will start and stop Gravitino server automatically../gradlew :clients:client-python:test -
Distribute the Gravitino Python client module
./gradlew :clients:client-python:distribution -
Deploy the Gravitino Python client to https://pypi.org/project/apache-gravitino/
./gradlew :clients:client-python:deploy
IDE specific settings
JetBrains IntelliJ IDEA
We use Conda Environment to manage Python Environment, to configure Python SDK, you need to:
-
Make sure you installed Python Plugin.
-
Make sure you followed the step to build python module in Build and testing
-
Make sure you are at the root directory of Gravitino Git repository.
-
Find conda executable by executing this command
find $(pwd)/.gradle/python/*/Miniforge3/bin/conda

# example output
/Users/YOUR_USER_NAME/gravitino/.gradle/python/MacOSX/Miniforge3/bin/conda -
Find Python Interpreter with this command:
find $(pwd)/.gradle/python/*/Miniforge3/envs/*/bin/python

# example output
/Users/YOUR_USER_NAME/gravitino/.gradle/python/MacOSX/Miniforge3/envs/python-3.9/bin/python -
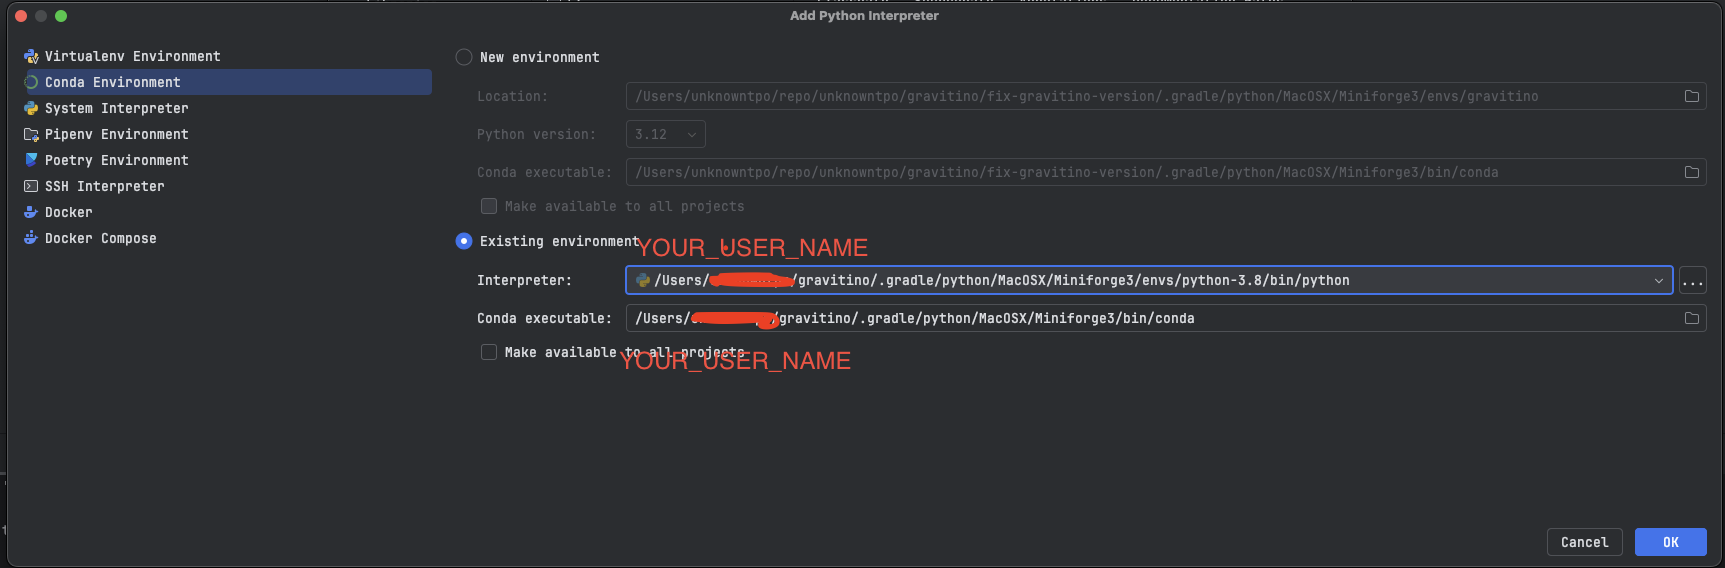
Follow steps in Create a conda environment, and at step 5, choose Existing conda environment
-
Fill in the output from step 4 into Conda executable field, step 5 into Interpreter field.
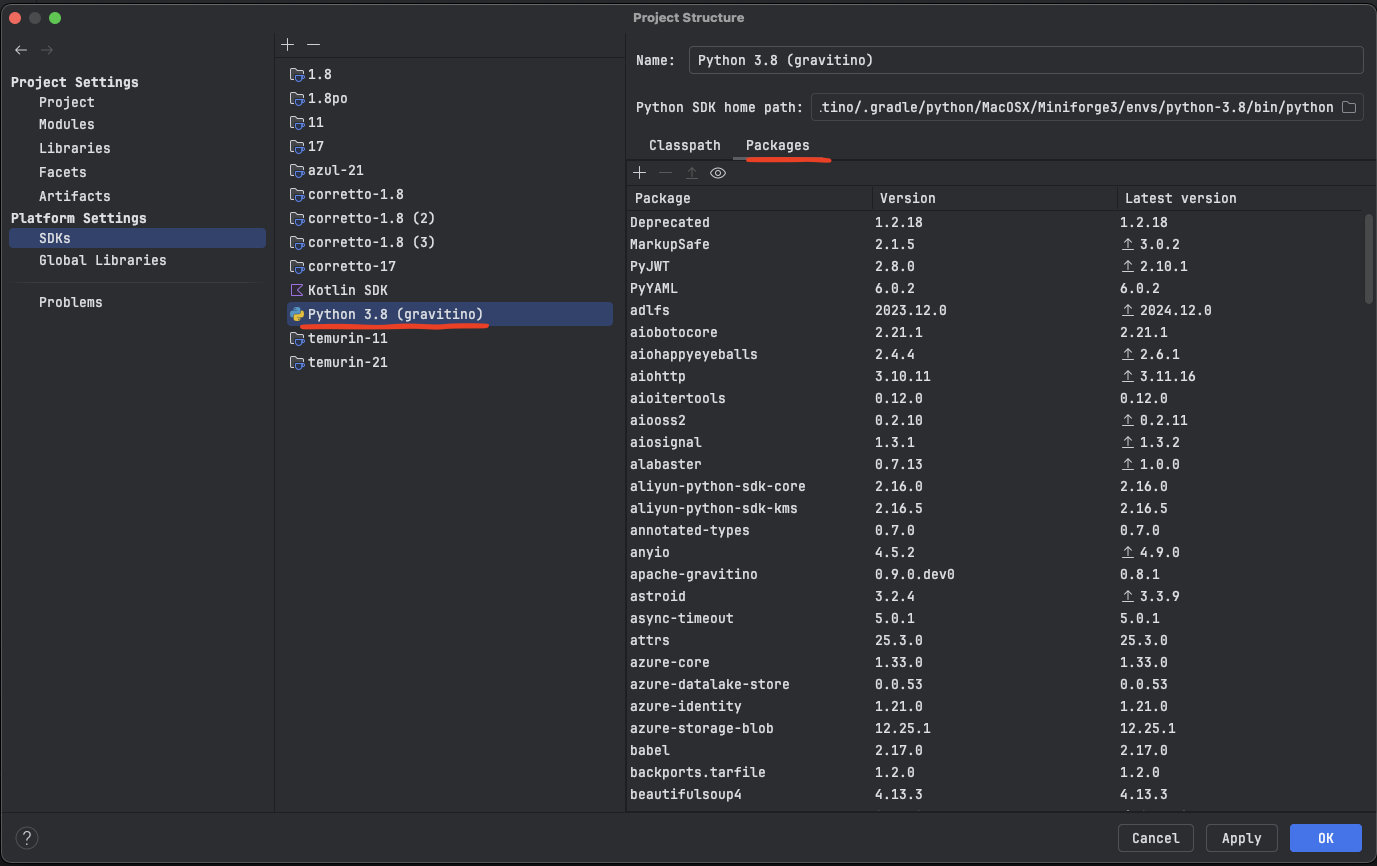
 And you will see a new Python SDK is added, and it has several packages installed.
-
Set
clients/client-pythonmodule sdk to the one we set in previous step.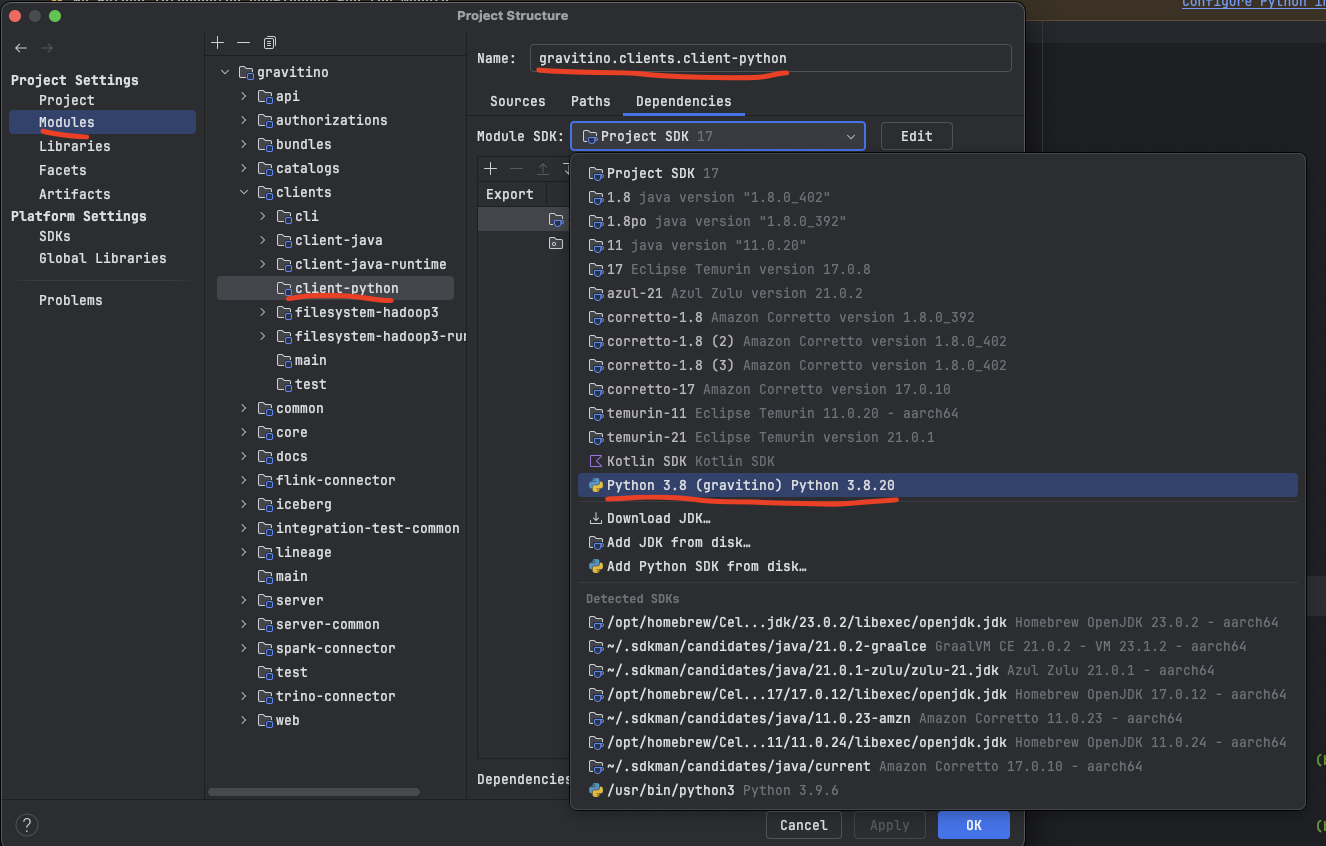
-
Done! Now, open any python files and start developing Gravitino Python Client.
Note about running integration tests of Gravitino Python client in IntelliJ IDEA.
Since integration tests require Gravitino Java distribution, so you can not run tests with IntelliJ Run tests button, Please execute this gradle task with Gradle Plugin or in command line to run integration tests.
./gradlew clients:client-python:integrationTest
Or, you would see errors like:
...
ERROR:tests.integration.integration_test_env:Gravitino Python client integration test must configure `GRAVITINO_HOME`

Process finished with exit code 0
Resources
- Official website https://gravitino.apache.org/
- Project home on GitHub: https://github.com/apache/gravitino/
- Playground with Docker: https://github.com/apache/gravitino-playground
- User documentation: https://gravitino.apache.org/docs/
- Slack Community: https://the-asf.slack.com#gravitino
License
Gravitino is under the Apache License Version 2.0, See the LICENSE for the details.